Enhanced API Scanning with Postman Support in Qualys WAS

Due to the fast-growing usage of REST APIs, having a way to test them for vulnerabilities in an automated, reliable way is more important than ever. Automated testing of APIs is a little trickier than for web applications. You can’t simply enter a starting URL for the scanner and click “Go”. Additional setup is required to describe the API endpoints for the scanner. The good news is that Qualys Web Application Scanning (WAS) offers multiple ways to set up a scan for your APIs.
Up to now Qualys WAS has provided two methods to set up scanning of your APIs:
- Proxy capture method
- Swagger/OpenAPI file method
Now, WAS supports a 3rd method – Postman Collections. As we’ll explain, this method can provide better vulnerability testing compared to the others.
What is a Postman Collection?

Postman is a widely-used tool for functional testing of REST APIs. A Postman Collection is a file that can be exported from the tool that clubs together related requests (API endpoints). Many organizations who have developed REST APIs for their services have published Postman Collection files for them. Two examples are Box and Okta.
The Postman tool includes a facility to export the Postman Collection and share them with other users. These collections are exported in JSON format. Postman Collections also support Variables. A variable is replaced by its actual value at run-time. Variables can also be defined at different levels: Collection level, Environment level, and Global level.
Postman Collection support in WAS
With the release of Postman Collection support in Qualys WAS, customers have the option to configure their API scans using the Postman Collection for their API.
The process is simple:
- Postman collections created for functional testing can directly be used for security testing through Qualys WAS.
- From the Postman tool, export your Collection file(s).
- Upload the Collection file into Qualys WAS (specifically, the Application Details panel when editing a Web App).
- Optionally, upload related files: 1) a Postman Environment Variables file, and 2) a Postman Global Variables file.
Customers can configure scan settings as normal before launching a scan. The crawling and testing of the API will be limited to the requests present in the Collection. For more information, see API Testing with Postman Collections.
Advantages of a Postman Collection scan
There are several advantages to using a Postman Collection to scan your APIs.
- Requests typically include valid values for all query parameters and request body parameters. These values should pass the server side data validation.
- The requests can be in a functional workflow. For example, the proper functional flow for a blog site is for a user to first create the blog post and then subsequently add a comment to the blog post. This flow can be described in a Postman Collection and is extracted by the scanner so that tests can be performed in the correct order and will be accepted by server.
- Variables allow the scanner to extract a value from the output of one API call and use it in a subsequent API call.
Here we will present two scenarios where using a Postman Collection would provide a better scan compared to using a Swagger file or using the proxy capture method.
Scenario 1: Testing the Edit operation for a particular endpoint
A. Using Postman Collection
- A Postman Collection is created with the proper workflow for functional testing.
- The user uploads the Postman Collection into WAS to set up the scan.
- The Collection has a “Create Object” POST request defined first. Here the API endpoint is “/students”
REQUEST
POST /students HTTP/1.1
Content-Type: application/json
User-Agent: PostmanRuntime/7.15.2
Accept: */*
Cache-Control: no-cache
Postman-Token: 5d2f73c6-c63b-47b0-869f-fdcbd77dd9d2
Host: 10.115.77.114:3333
Accept-Encoding: gzip, deflate
Content-Length: 239
Connection: close

{
	"Student_Name": "new Student Added",
	"Parent_Name": "new Parent Added",
	"Emergency_Ph_No": "784561235",
	"Student_Email": "newstudentAdded12@gmail.com",
	"Role_Id": 1,
	"Class_Id": 3
}
RESPONSE
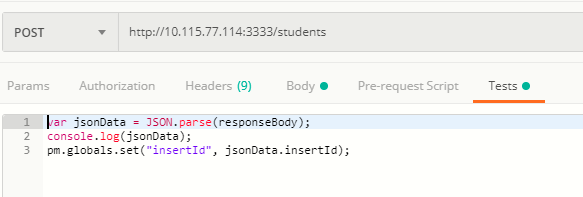
HTTP/1.1 200 OK X-Powered-By: Express Access-Control-Allow-Origin: * Content-Type: application/json; charset=utf-8 Content-Length: 130 ETag: w/"82-DiJZ3k94I9eUbXfFdLkuQTUJuas Date: Thu, 18 Jul 2019 12:51:02 GMT Connection: close {"fieldCount": 0, "affectedRows": 1, "insertId": 1241, "serverStatus": 2, "warningCount": 0, "message": "", "protocol41": true, "ChangedRows": 0} - The POST request creates a new student record and a numeric value called “insertId” is returned, representing the ID of the student just created.
- Using a script under “Tests”, the value for “insertId” is saved to an environment variable.
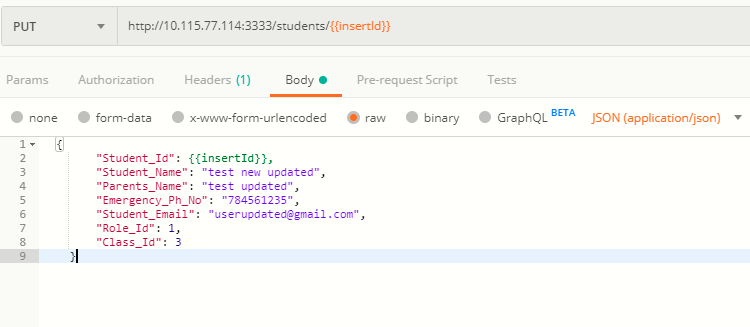
- The next request is a PUT request to update the student record. In the definition of the request, the “insertId” environment variable is used for the “Student_Id” parameter.
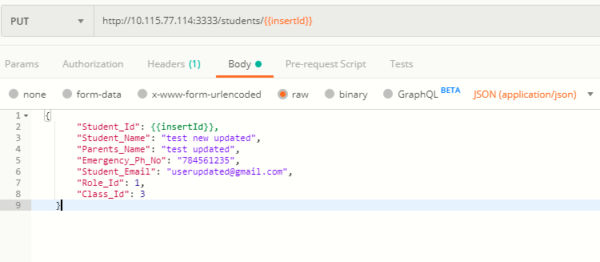
- When the PUT request to update the student record is done, the actual value of “insertId” is used, resulting in a valid request for an existing student.
REQUEST
PUT /students/1241 HTTP/1.1
Content-Type: application/json
User-Agent: PostmanRuntime/7.15.2
Accept: */*
Cache-Control: no-cache
Postman-Token: 5d2f73c6-c63b-47b0-869f-fdcbd77dd9d2
Host: 10.115.77.114:3333
Accept-Encoding: gzip, deflate
Content-Length: 255
Connection: close

{
"Student_Id": 1241,
"Student_Name": "test new updated",
"Parent_Name": "test updated",
"Emergency_Ph_No": "784561235",
"Student_Email": "userupdated@gmail.com",
"Role_Id": 1,
"Class_Id": 3
}
RESPONSE
HTTP/1.1 200 OK X-Powered-By: Express Access-Control-Allow-Origin: * Content-Type: application/json; charset=utf-8 Content-Length: 168 ETag: w/"82-DiJZ3k94I9eUbXfFdLkuQTUJuas Date: Thu, 18 Jul 2019 12:51:02 GMT Connection: close {"fieldCount": 0, "affectedRows": 1, "insertId": 0, "serverStatus": 2, "warningCount": 0, "message": "Rows matched:1 Changed: 0 Warnings: 0", "protocol41": true, "ChangedRows": 0} - As part of the Postman Collection scan, WAS will crawl both the POST and PUT requests with valid IDs.
- When WAS tests/fuzzes the PUT request with various payloads, it will use a valid ID, so the server will accept it and perform the PUT operation. If the endpoint is vulnerable, WAS should be able to detect it.
B. Using Swagger/OpenAPI
- The user sets the web app’s target URL in WAS as the location of the Swagger file.
- A scan is launched, and the scanner parses the Swagger file to extract all the API endpoints along with example data, if present.
- The API endpoints are crawled with random values or example values provided.
- The POST request to create the student record may succeed, because the request has values with appropriate data.
- The student ID value in the PUT request (to update the student record) is a random integer, so it is unlikely to be valid.
- The PUT request returns an error saying “Student record not found”.
- WAS proceeds to test/fuzz the crawled PUT request with various payloads, but all the fuzzed requests return an error saying “Student record not found”.
- In this case, the PUT request is not tested as thoroughly compared to the Postman Collection method.
Scenario 2: Testing the Add Comment operation for a particular endpoint
Consider a scenario of adding the comment to the published blog. There are three validations that come into picture:
- The blog post first needs to be created.
- The post needs to be published.
- Once in published state, any user can add comments to the blog post.
- The API endpoints are defined as follows:
- Add blog post:
POST http://domain.com/api/blogs - Publish blog post:
PUT http://domain.com/api/blogs/{blogId} Body: {blogId: “<blogId>”, plublished: “true”} - Add a comment to the blog post:
POST http://domain.com/api/blogs/{blogId}/comments Body: {AddedBy: “username”, comment: “<comment_text>”}
- Add blog post:
A. Using Postman Collection
- The user creates the Postman Collection to test the complete functional work flow.
- The user adds the requests in proper sequence in the Collection and also defines a Postman variable to extract blogId from the POST request
- The variable is used in the PUT request as well as in adding a comment via the POST request.
- When this kind of Postman Collection is provided for a WAS scan, the scanner will crawl all the endpoints and do the correct vulnerability test on them.
- The endpoint to add a comment will be tested properly for all the vulnerabilities
B. Using Swagger/OpenAPI:
- The user sets the web app’s target URL in WAS as the location of the Swagger file.
- A scan is launched, and the scanner parses the Swagger file to extract all the API endpoints along with example data, if present.
- The API endpoints are crawled with random values or example values provided.
- The POST request to create the blog record may succeed, because the request has values with appropriate data.
- The value of “blogId” used in the PUT request is a random integer, so it is unlikely to be valid.
- The PUT request to publish returns an error saying “Unable to publish – blogId not valid”.
- The POST request for adding a comment also fails with an error saying “Comment not added – blogId not valid”.
- Similar to scenario #1, vulnerability testing of the PUT request and the POST request would not tested as thoroughly compared to the Postman Collection method.
Current Limitations
Postman Collections may include JavaScript code. This code is executed in a sandboxed JavaScript environment. In case of the WAS scanning engine, the JavaScript environment has a few limitations, including:
- In the Test scripts, dynamic variables are not supported. This includes {{$guid}}, {{$timestamp}}, and {{$randomInt}}.
- In the Test scripts, the “pm.sendRequest()” function is not supported.
- In the Prerequest scripts and Test Scripts, currently only ES5-compliant JS code is supported. Support for ES6-compliant JS code will be added in future.