Get BASH ShellShock Alerts Using Qualys Continuous Monitoring
ShellShock is a wide-reaching vulnerability with multiple attack vectors. If you use Linux or Unix machines in your network you are likely to have the vulnerability. Beyond running a normal Qualys vulnerability scan and report to get a snapshot in time of your vulnerable machines, it makes sense to use Qualys Continuous Monitoring (CM) to immediately get alerted if the BASH ShellShock vulnerability is detected on your perimeter hosts. This can even happen after you have patched all occurrences already, as we have seen with the Heartbleed vulnerability. With Heartbleed, customers have reported repeating occurrences as IT staff was using older images to install new hosts or appliances were brought online with a vulnerable version installed. Continuous Monitoring makes it easy to alert on these often unexpected conditions. (Don’t have Continuous Monitoring? Contact Support or your Technical Account Manager to get it; or sign up for a free trial.)
Getting started is easy. Log in to Continuous Monitoring and follow these quick steps.
Step 1 – Configure a Ruleset
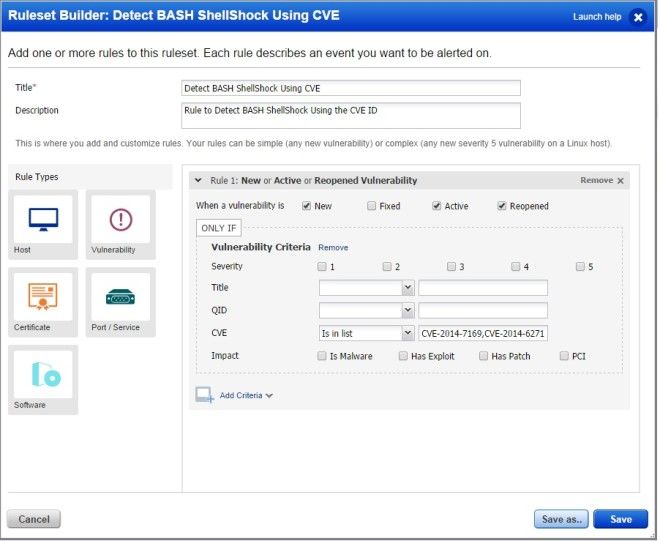
Go to Configuration > Rulesets and click New Ruleset. Give your ruleset a name, a description and add vulnerability rules. You’ll need to choose the Vulnerability rule type on the left and drag it to the right. Select New, Active and Reopened, and then click Add Criteria to specify additional vulnerability criteria, as described below.
- CVE ID is in the list: CVE-2014-7169, CVE-2014-6271. If a vulnerability matching one of these CVE IDs is found, then an alert will be generated.
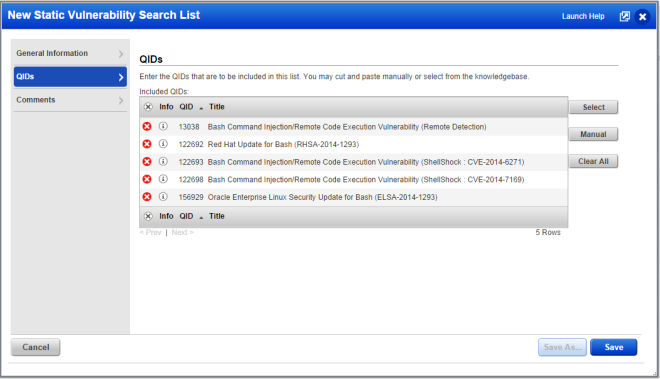
- QID is in the list: 122698, 13038, 122693, 156929, 122692. If a matching QID is found, then an alert will be generated.
How are rules evaluated? We evaluate rules against your most recent vulnerability scans. Alerts are generated as soon as scan results are processed.
Sample Rule using CVE IDs
Sample Rule using QIDs
Step 2 – Configure a Monitoring Profile
This is where you specify the hosts you want to monitor and who should be notified of new alerts.
Go to Configuration > Monitoring Profiles and click New Profile. Follow the wizard to specify which hosts you want to monitor, what you want to be alerted on (select the ruleset created in Step 1) and which users should be notified (you’ll select distribution groups).
Step 3 – Run Vulnerability Scans in VM
Alerts are directly tied to your vulnerability scans – they’re generated as soon as scan results are processed. Tip – Run partial scans and get alerts faster. We recommend you do this using search lists.
Create search lists
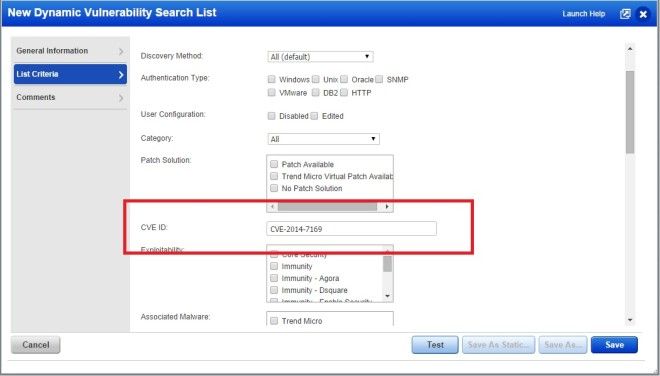
Go to Scans > Search Lists. 1) Create a static search list and specify the BASH ShellShock QIDs, or 2) Create a dynamic search list and specify the CVE IDs.
Add your search list(s) to an option profile
It’s easy to do. Create or edit an option profile and go to the Vulnerability Detection section. Then select Custom and add your list(s). Run vulnerability scans on your perimeter hosts using this option profile. You should scan hosts on a frequent or continuous basis to immediately receive alerts as new risks are detected.
Sample Static Search List
Sample Dynamic Search List
Step 4 – View Your Alerts
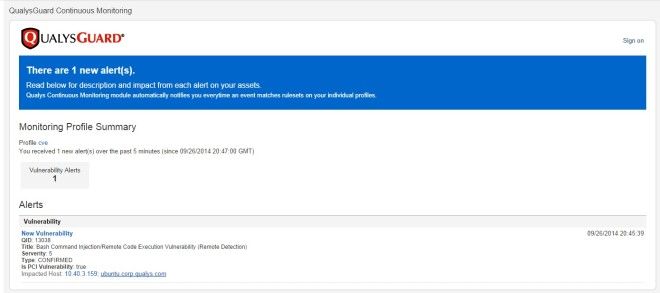
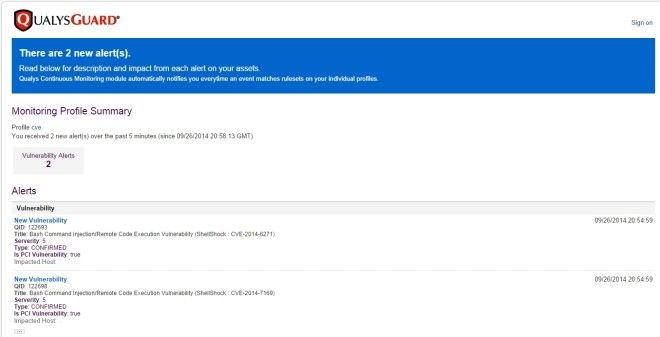
Alerts appear in Continuous Monitoring. Go to Alerts and you’ll see alert details for your scanned hosts. Don’t forget – you can set up email notifications to be notified of new alerts. You can have notifications sent every 5 minutes, every 20 minutes, hourly, daily, weekly, etc.
Check out these sample alerts:
That’s it! Follow the steps above, and you will receive notifications whenever new instances of ShellShock are identified on your systems.
For more information, read BASH Shellshock vulnerability.
